Production Install on Windows Server (Unofficial)
Install Mattermost in production mode on one, two or three machines.
Attention
This unofficial guide is maintained by the Mattermost community and this deployment configuration is not yet officially supported by Mattermost, Inc. Community testing, feedback and improvements are welcome and greatly appreciated.
Contents
Install Windows Server 2012+
- Set up 3 machines with any edition of Windows Server 2012+ (except core) with 2GB of RAM or more. The
servers will be used for the Web Proxy & SSL Termination, Mattermost, and Database. The screenshots
used in this guide are from Microsoft Server 2012, but similar steps should work for other versions.
- Optional: You can also use a single machine for all 3 components in this install guide, depending on the standards of your data center. In this case, replace all 10.0.0.* IP addresses with a single/common address.
- Make sure the systems are up to date with the most recent security patches by executing Windows Update.
Set up Database Server
- Login to the database server. For the purposes of this guide we will assume this server has an IP address of 10.0.0.1.
Install & Configure MySQL
- Download the MySQL 5.6+ installer, or (PostgreSQL 9.3+). For the purposes of this guide, we’ll be downloading and installing the latest version of MySQL Community Server Edition MSI-installer (version 5.7 at the time of writing this guide). Note that the appropriate link refers to 32-bit (as shown in the figure below); however, this installer is 32-bit but is capable of installing the 64-bit version of MySQL.
- Launch the installer.
- On the License Agreement page, Check the box to accept the license terms and press Next.
- On the Choosing a Setup Type choose Custom so you can decide exactly which packages to install. This is the only place where you can specify whether to install 32-bit or 64-bit MySQL Server.
- On the Select Products and Features page, select the 64bit version of MySQL Server.
- On the Check Requirements page, install any missing requirements by pressing the Execute button, or go back to the previous page and change the packages that will be installed to remove the requirement. Once all of the requirements are met, press the Next button.
- On the Installation page, you will be shown a list of software that will be installed. Press the Execute button to begin the installation. Once the installations have completed, press the Next button.
- On the Product Configuration page, press the Next button to begin the MySQL Server Configuration Wizard.
- On the Type and Networking page, select the appropriate Config Type based on your desired usage.
- On the Accounts and Roles page, enter a MySQL Root password and press the Next button.
- On the Windows Service page, keep the defaults and press the Next button.
- On the Plugins and Extensions page, keep the defaults and press the Next button.
- On the Apply Server Configuration page, press the Execute button to configure the MySQL Server installation.
- Returning to the Product Configuration page, press the Next button.
- On the Installation Complete page, press the Finish button.
Configure Windows PATH
Adding MySQL to the Windows PATH variable will allow you run various commands from the console, and allow 3rd party applications to execute various MySQL commands.
- Press the
WIN + PAUSEBREAKkey combination to open the System Control Panel Applet. - Select the Advanced System Settings link.
- Select the Advanced tab.
- Press the Environment Variables button.
- In the System Variables section, select the Path variable in the list, then press the Edit button.
- Append the path to your MySQL Server bin directory (make sure to add a semi-colon after any existing
items in the path before appending the new path). The default path for a 64-bit
installation is
C:\Program Files\MySQL\MySQL Server 5.7\bin.
Create Mattermost Database
Now that MySQL has been installed and configured, a database and user account must be provisioned for Mattermost to utilize.
Open a command prompt and enter
mysql -u root -pto connect to the MySQL serverWhen prompted, enter the password created in step 9.a.
At the
mysql>prompt, execute the following commands to create the database and user accountCREATE DATABASE mattermost; CREATE USER mmuser IDENTIFIED BY 'mmuser_password'; GRANT ALL ON mattermost.* TO mmuser; exit
To confirm the database and user were configured correctly
- Connect to the MySQL server/datbase by executing
mysql -u mmuser -p mattermost - When prompted, entering
mmuser_password - If If successful, you will be at the
mysql>prompt - Type
exitto finish
- Connect to the MySQL server/datbase by executing
Set up Mattermost Server
For the purposes of this guide we will assume this server has an IP address of 10.0.0.2
Download the latest Mattermost Server by opening your favorite browser and navigating to
https://releases.mattermost.com/X.X.X/mattermost-team-X.X.X-windows-amd64.zipwhere X.X.X is the latest Mattermost release version. For example, 3.4.0.Create the storage directory for files. We assume you will have attached a large drive for storage of images and files. For this setup we will assume the directory is located at
c:\mattermost\data. Your directory structure should look similar to the image below.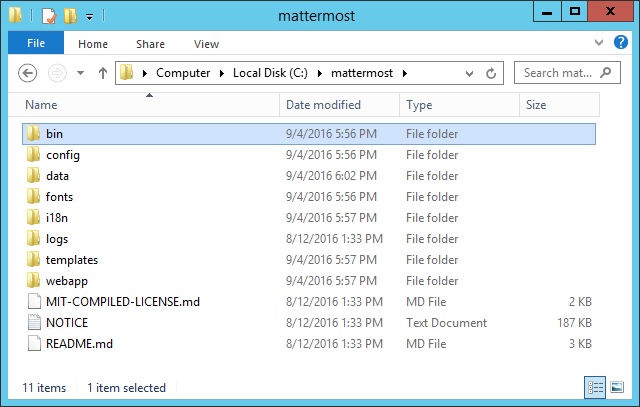
Configure Mattermost Server by editing the config.json file at
c:\mattermost\config\config.json.- Update database name and server in the the connection string:
- Old:
"DataSource": "mmuser:mostest@tcp(dockerhost:3306)/mattermost_test?charset=utf8mb4,utf8" - New:
"DataSource": "mmuser:mmuser_password@tcp(10.0.0.1:3306)/mattermost?charset=utf8mb4,utf8"
- Old:
Note
Optionally you may continue to edit configuration settings in
config.jsonor use the System Console described in a later section to finish the configuration.- Update database name and server in the the connection string:
Test the Mattermost Server
Open a command prompt, and execute
cd c:\mattermost\binto change your working directoryExecute
platform.exeVerify that mattermost is running and connected to the database successfully by confirmed a console log like
Server is listening on :8065letting you know the service is running.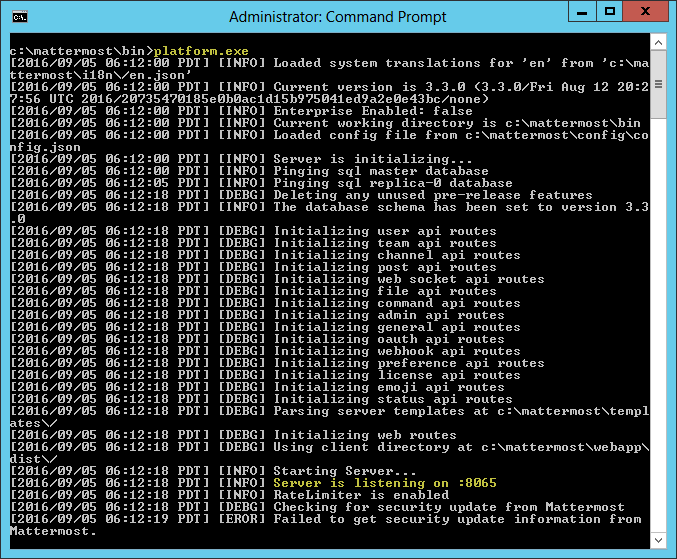
Stop the server by pressing CTRL+C
Configure the Firewall
Note
This is not required if you are installing on a single server.
Open a command prompt as an administrator
Execute the following command to allow inbound traffic to Mattermost
netsh advfirewall firewall add rule name="Mattermost" dir=in action=allow program="C:\mattermost\bin\platform.exe" enable=yes
Establish a Windows Service
Establishing a windows service to supervise the Mattermost process is recommended to prevent the need to manually start/stop Mattermost. The included binary cannot be directly registered as a windows service; therefore, a wrapper-utility must be used.
Download the latest version of NSSM (Non-Sucking Service Manager).
From the downloaded zip-file, extract
win64\nssm.exetoC:\mattermost\bin\Open a command line as an administrator
To create the windows service, execute the following
cd c:\mattermost\bin
nssm install mattermost c:\mattermost\bin\platform.exe
Start the service by executing the following
net start mattermost
tasklist /FI "IMAGENAME eq platform.exe"
Verify Mattermost Connectivity
To verify all steps executed thus far, we’ll attempt to access Mattermost through standard HTTP traffic. To perform this step, you’ll need access to a client machine with a compatible browser (e.g. Safari, Firefox, IE11, Chrome, etc).
From a client workstation meeting the criteria above, launch your favorite web browser.
Navigate to
http://10.0.0.2:8065. If successful, you should reach an initialization web-page similar to the screenshot below.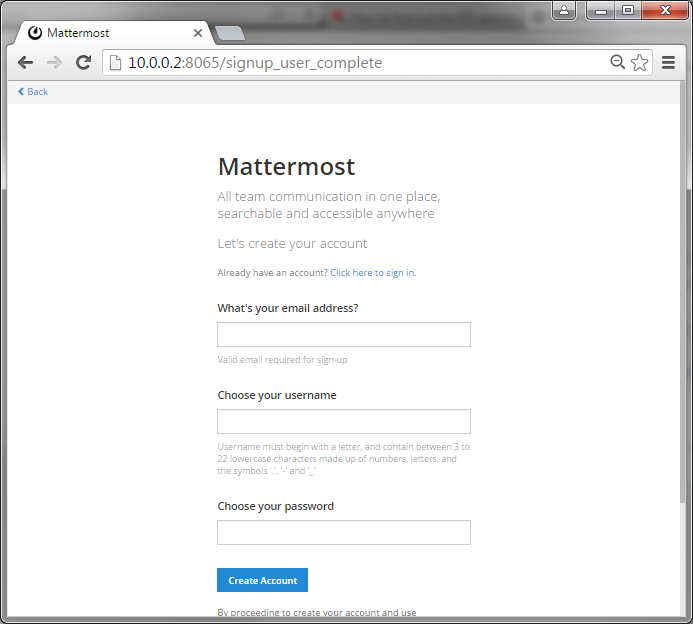
Assuming your test was successful, close the browser as we’ll finish initializing Mattermost later in this guide.
Set up Web Proxy Server
A reverse proxy is recommended in order to provide:
- SSL termination
- HTTP to HTTPS redirection
- Port mapping :80/:443 to :8065
- Standard request logs
- Load balancing (not described in this guide).
Internet Information Server (IIS) for Windows Server is the standard capability provided out-of-the-box that provides this function.
- For the purposes of this guide we will assume this server has an IP address of 10.0.0.3.
- Map a FQDN (fully qualitified domain name), like mattermost.example.com to the proxy server (e.g. 10.0.0.2).
Install IIS
- On the Start page, click the Server Manager tile, and then click OK.
- In Server Manager, select Dashboard, and click Add roles and features.
- In the Add Roles and Features Wizard, on the Before you begin page, click Next.
- On the Select installation type page, select Role-based or feature-based installation, and click Next.
- On the Select destination server page, select Select a server from the server pool, select your server, and click Next.
- On the Select server roles page, select Web Server (IIS).
- Expand Web Server (IIS) > Web Server > Application Development and select WebSockets Protocol, and then click Next.
- On the Add Roles and Features Wizard popup dialog, click Add Features, and then click Next.
- On the Select features page, click Next.
- On the Web Server Role (IIS) page, click Next.
- On the Select role services page, accept the default selections, and click Next.
- On the Summary of Features to Install page, click Install.
- On the Installation progress page, confirm that your installation of the Web Server (IIS) role and required role services completed successfully, and then click Close.
- To verify that IIS installed successfully, navigate to
http://localhostin a web browser on the server, and confirm the default IIS Welcome page is displayed.
Configure Reverse Proxy
Reverse proxying involves rewriting an HTTP request and relaying it to a back-end server. IIS does not natively support this; however, Microsoft provides a URL Rewrite module and an Application Request Routing module which, when combined, are capable of performing these functions. We’ll start by installing these module, and then configure the proxy.
Download the URL Rewrite 2.0 x64 module.
Download the Application Request Routing 3.0 x64 module.
Install the modules (trivial installers with no customizations or options to select).
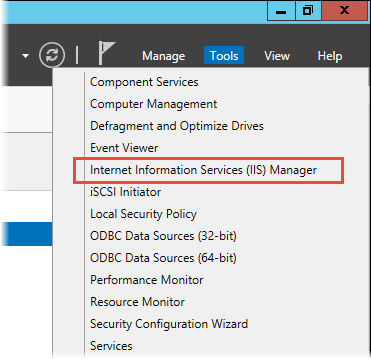
On the Start page, click the Server Manager tile, and then click OK.
Expand the Tools menu, and select Information Information Services (IIS) Manager.
In the left-hand navigation tree, expand the server node, expand Sites, and select Default Web Site.
Double-click the URL Rewrite feature, as shown below.
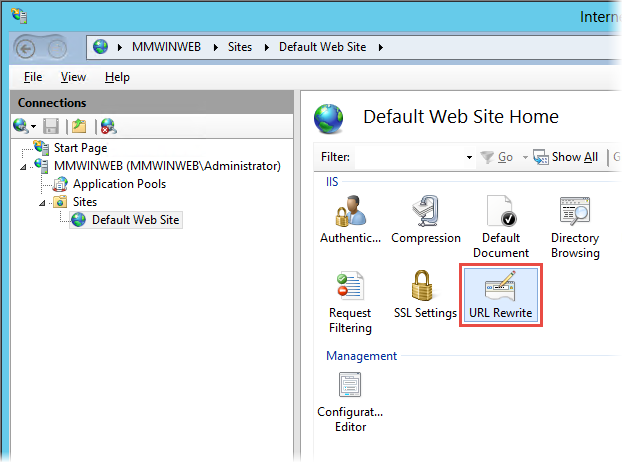
In the actions pane (far-right), select Add Rule(s)...
Select Reverse Proxy and press OK.
If prompted to enable proxy functionality, press OK.
In the Add Reverse Proxy Rules dialog,
- Enter
10.0.0.2:8065in the Enter the server name or IP address where HTTP requests will be forwarded field. - Ensure the Enable SSL Offloading option is checked.
- Check Rewrite the domain names of the links in HTTP responses
- Enter
10.0.0.2:8065in the From field. - Enter
mattermost.example.comin the To field. - Press OK
- Enter
At this point, your configuration will relay all incoming traffic from http://mattermost.example.com to http://10.0.0.2:8065/. To confirm this, open your favorite browser and attempt to access http://mattermost.example.com, and upon success, you’ll see the Mattermost initialization screen.
Configure SSL
Note
SSL communication requires that the web server have a well-formed and trusted certificate. A common freely-available SSL encryption and certificate managemet is Let’s Encrypt; however, this service does not formally support the Windows Operating system. A number of third-parties have created clients to support this, and you are free to try out any of them. This section assumes that you have taken the necessary steps to obtain a web-server certificate that will be trusted by your users.
- Within the IIS Manager, select the server node in the left-hand connections pane.
- Double-click the Server Certificates option.
- Select Import... from the list of actions on the right-hand-side.
- Press the ... button to locate your PFX formatted certificate.
- Enter the password to the certificate file.
- Select the Web Hosting certificate store, and press OK.
- In the left-hand navigation tree, expand the server node, expand Sites, and select Default Web Site.
- In the right-hand-side Actions pane, select Bindings....
- Press Add
- In the Add Site Binding dialog, Set the type to https and set the SSL Certificate to the certificate loaded previously. Press OK.
Redirect HTTP to HTTPS
In the left-hand navigation tree, expand the server node, expand Sites and select Default Web Site.
Double-click to open the Url Rewrite feature.
In the actions-pane (far-right), select Add Rule(s)..
Under the Inbound Rules section, select Blank rule and press OK.
Populate the fields in the rule to match the screenshot below
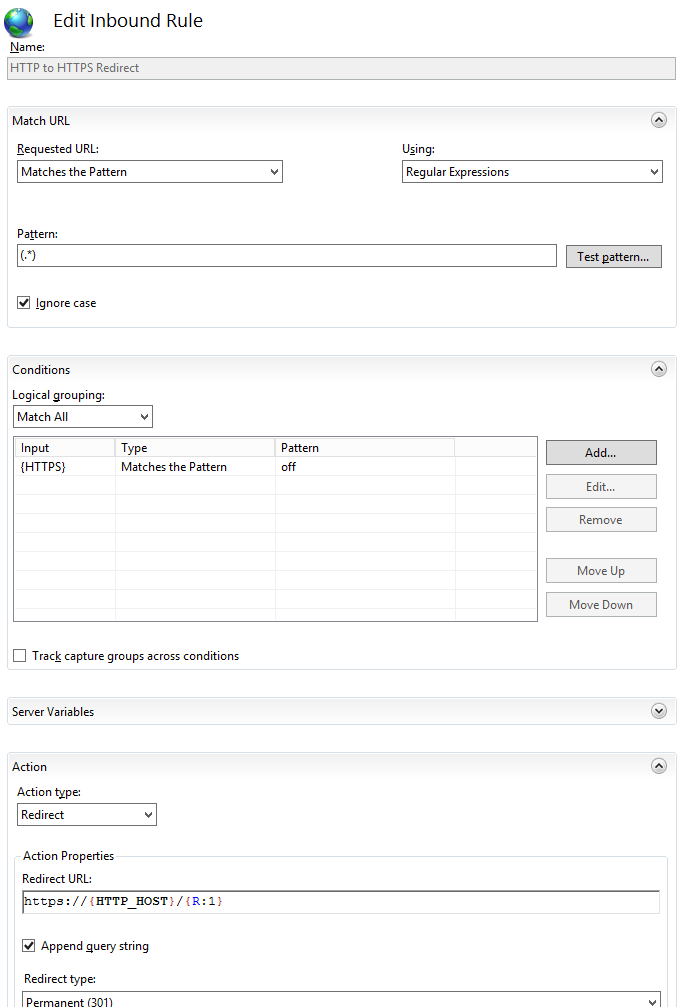
Press Apply and then press Back to Rules.
Ensure that the HTTP to HTTPS Redirect rule is at the top of the list of inbound rules. If nceessary, you can select a rule and use the Move Up and Move Down actions to reorganize.
On a client workstation, open your favorite browser and navigate to http://mattermost.example.com and confirm that you are redirected to https://mattermost.example.com.
Finish Mattermost Server Setup
Navigate to
https://mattermost.example.comand create a user and team.The first user in the system is automatically granted the
system_adminrole, which gives you access to the System Console.From the
town-squarechannel click the dropdown next to your team name and choose theSystem ConsoleoptionUpdate General > Configuration settings to properly configure your reverse proxy by entering https://mattermost.example.com as the Site URL
Attention
Failure to properly set the Site URL properly __will__ result in unexpected behavior.
Update Notification > Email settings to setup an SMTP email service. The example below assumes AmazonSES.
- Set Send Email Notifications to true
- Set Require Email Verification to true
- Set Feedback Name to
No-Reply - Set Feedback Email to
mattermost@example.com - Set SMTP Username to
[YOUR_SMTP_USERNAME] - Set SMTP Password to
[YOUR_SMTP_PASSWORD] - Set SMTP Server to
email-smtp.us-east-1.amazonaws.com - Set SMTP Port to
465 - Set Connection Security to
TLS - Save the Settings
Update File > Storage settings:
- Change Local Directory Location from
./data/to/mattermost/data
- Change Local Directory Location from
Update General > Logging settings:
- Set Log to The Console to
false
- Set Log to The Console to
Update Advanced > Rate Limiting settings:
- Set Vary By Remote Address to false
- Set Vary By HTTP Header to X-Real-IP
Feel free to modify other settings.
Login to the Mattermost server (10.0.0.2) and restart the Mattermost Service by typing the following into a command line
net stop mattermost
net start mattermost
